This one very long post, request you to fallow the steps to add the sytsem in solman.
This Post describes the steps that are required to connect a (new) SAP system to the SAP Solution Manager, for instance to generate EarlyWatch Alert reports or for including the system on Solution Monitoring.
This Post describes the various steps that have to be performed, depending on the type of SAP system and the configuration that exists in Solution Manager. For a fresh installation of Solution Manager, all steps have to be performed at least once
However, sometimes systems are created under the wrong product in the Solution Manager when they are retrieved from the SLD. It is recommended to change the assigned product if it is not correct. Although for monitoring purposes it is not required per se, it is for usage of Maintenance Optimizer.
Way of working in practice:-
For SAP Net weaver 2004 and later systems, an installation key is required upon installation. This key has to be created using the SAP Solution Manager. To perform this action, the system will need to be created in Solution Manager. The general approach here is to create a new system (and assign the correct product), but not adding any data such as the database or server: this data is not required to generate the installation key. Then installing the system and registering it in the SLD, so the SLD will have also the technical data of the system. This information will then automatically be replicated to Solution Manager and enrich the system information there.
For JAVA systems, after the data got replicated from the SLD to Solution Manager, some additional actions are required.
This is required as the ‘relevance’ field is used by Solution Manager to determine which systems can be mapped to which logical components. By default, systems have ‘Application Server ABAP’ as relevant component. As J2EE only systems do not have this system component, their product is not recognized. This has to be maintained in the ‘Landscape Components’ ‘Systems’ part of the landscape definition (transaction SMSY).
Choose the system that is to be maintained and choose the ‘Selection of Main Instances’ tab. Here, uncheck the check behind ‘Application Server ABAP.

See the Above screen shot i added one of the ABAP + Java system in Solman.

Finally, click the ‘Save’ button.
The system data for a JAVA system has now been correctly maintained in the Solution Manager
For availability monitoring (i.e. is the system UP) the CCMSPING agent is used. This agent will periodically, usually once a minute, check to see whether it performs a log on to a system. This section describes how to add a system to the systems monitored by CCMSPING
First, on the host where the CCMSPING agent is running (usually the Solution Manager host itself), add the following entry to the services file (:\WINDOWS\system32\drivers\etc\services)sapms 36/tcp where is the monitored systems SAP System ID and is the monitored systems instance number.
Note: theapplies to the instance number of the ABAP message server. If no ABAP message server exists for the SAP system (i.e. in case of JAVA only systems, no service has to be maintained in the services file.

By connecting to the message server, the CCMSPING agent will retrieve data about the various instances of the SAP system, including their availability and response time.
Note: to save time, it might be a good idea to add as many known’s to the services file in one go.
After the action in the last step, the CCMSPING agent is able to retrieve the port on which an SAP system’s message server is listening. Next step is to configure the agent in Solution Manager itself.
Log on to the Solution Manager and call transaction RZ21.
From the menu choose ‘Technical Infrastructure’ --> ‘Availability Monitoring’ --> ‘Configure CCMSPING Availability mon.’ This shows a list of monitoring systems.
 From this screen, choose ‘Monitoring’ --> ‘Create system’.
Configuration here depends on the type of SAP system that is to be monitored.
Enter the required data in the screen:
 Choose ‘Copy Connection Data and Options’. Note: it might take some time before the CCMSPING agent will get it’s first data.
To check whether CCMSPING is correctly retrieving data from the monitored system, call transaction RZ20. Choose template: ‘SAP CCMS Monitor Templates’ ‘Availability and Performance Overview’.

The system should now be visible in the monitoring tree.
Create RFC connections
Note: this step is only required for ABAP (and ABAP+JAVA) systems.
For the Solution Manager to retrieve data from a monitored system, RFC connections are required. To create the RFC connections to a monitored system (and back) two steps have to be performed. Also, an administrator user is required in the monitored system.
At the end of these steps, three RFC connections from Solution Manager to the monitored system will have been created:
• an RFC called SM_CLNT_READ that is used for automatic data capture for monitoring purposes
• an RFC called SM_CLNT_TMW that is used when Change Request Management is configured in Solution Manager
• an RFC called SM_CLNT_TRUSTED that is used for interactive logon to the monitored system. This is a form of a SSO solution where users logon to the Solution Manager once and can then ‘jump’ to the monitored systems.
create the RFC connection in the monitored system that is not a part of SAP_ALL or SAP_NEW. This step adds this authorization object. Add the S_RFCACL authorization object to the administrative user. In the system to be monitored, call the profile generator (transaction PFCG).


Check Agent Registration

Choose ‘OK’ to continue.
Choose ‘Save’. Choose ‘Generate’. Choose ‘Back’ to go to role definition.
Back in the role maintenance screen, choose the ‘User’ tab. This makes it very quick to update the roles assign to users or assign the new role to a user. Enter the name of the user the role is to be assigned to and choose ‘User comparison’.

 Choose ‘Complete comparison’.
The administrative user (in this case called SAP-TI) now has authorizations to use and configure trusted RFC’s.
Note that every user in Solution Manager that is to use trusted RFC connections to log on to monitored systems, require these authorizations.
In the Solution Manager system, call transaction SMSY. Expand the ‘Systems’ tree to the system that should be connected. Then, select the row with the client that should be used for communication with Solution Manager (generally the productive client or customizing client’

 Generally, all the default settings can be kept. Make sure that the ‘Assign RFC dest. For System Monitoring’ checkbox is checked. This will automatically add the system to CCMS for monitoring. Choose the button. The system will now require you to log on to the system with an administrative user with execute privileges for authorization object S_RFCACL.
The result is an ABAP system that is now connected through RFC to the Solution Manager.
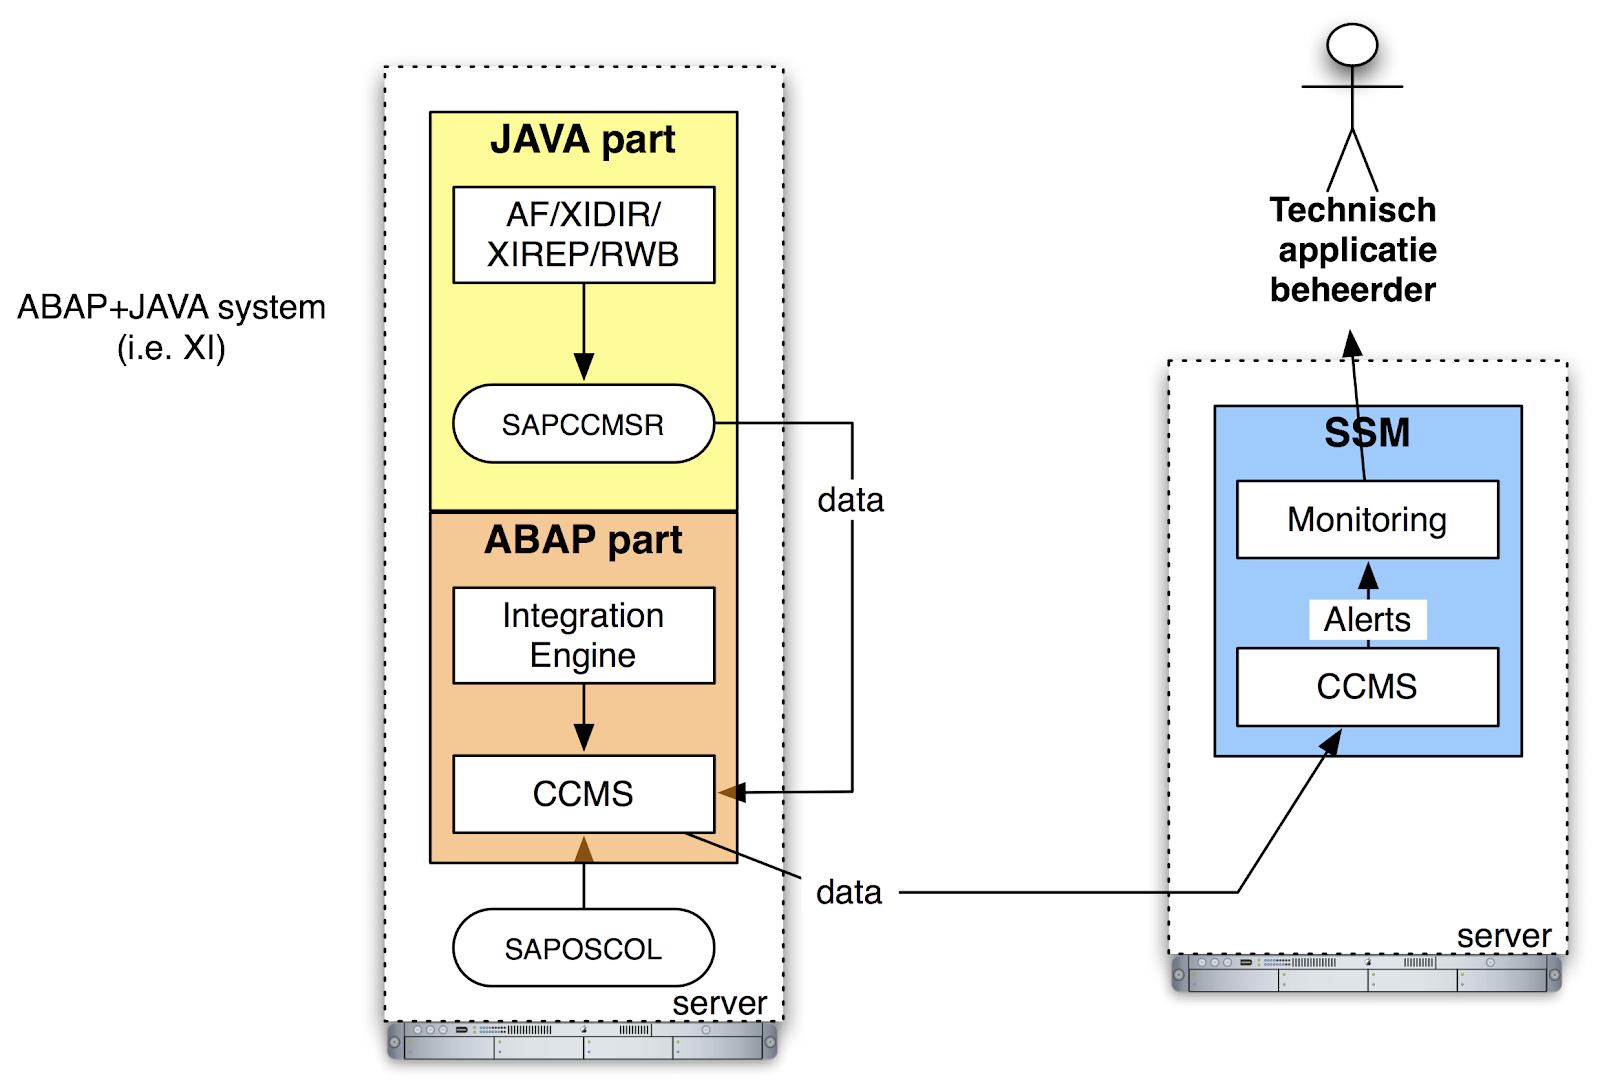
To collect information from systems based on the SAP WebAS JAVA, the SAPCCMSR agent is used. This agent runs on the monitored systems host and transfers collected data from the monitored system using RFC to the Solution Manager.
Depending on whether the host is a JAVA only or an ABAP+JAVA system, the configuration differs slightly:
• for JAVA only systems, the SAPCCMSR agent directly sends it’s data to the Solution Manager
• for ABAP+JAVA systems, the SAPCCMSR agent sends it’s data to the ABAP part of the monitored system, which then sends the data to the Solution Manager through the RFC connections defined in the previous section.
To perform this step, a userid and password for an administrative user and the CSMREG user is required for the system where the SAPCCMSR agent should register itself. Also, a csmconf file genereted in the system where the agent will register itself is required. Generating a csmconf file is described in the appendix to this chapter.


‘Dispatcher’ ‘Services’ ‘Monitoring’. Choose the ‘CCMS Agent Configuration’ tab. Choose the file on local filesystem and enter required passwords. Finally, click register


 The agent is shown and has status ‘Online’.
Groups’. Check if theof the J2EE system is added to the group J2EE_Systems.


Appendix: create csmreg user and csmconf file
This appendix describes how to create a csmreg user and csmconf file in an monitored ABAP+JAVA
system to which an SAPCCMSR agent should register.
In the monitored system, call transaction RZ21. Choose ‘Technical Infrastructure’ ‘Configure
Central System’ ‘Create CSMREG User’
 Creating the CSMREG user only requires a password to be entered. Hit ‘Enter’ to create the user

Choose the ‘New’ button
 Enter a name for the solution and your customer number. Choose ‘Continue’. The Solution has now been created.
SAP Solution Manager uses Logical Components to group the role sof systems of a specific product and version into a business function. For instance, multiple productive R/3 systems might exist in an organization for various business units. The concept of logical components support the option of creating different logical components for the general SAP product R/3 for various business units.
It is recommended to use only your own (custom) logical components, instead of the SAP delivered ones.


.
Choose ‘Save’ to save the changes to the Solution.
The new Logical Component has now been assigned to the Solution.
As now both a Solution and a Logical Component exist to which the monitored system can be
assigned, and the Solution and Logical Component have already been linked, assigning the
monitored system to the Solution is a matter of assigning it to the Logical Component. This section
describes how to perform this action.
In transaction SMSY, open the ‘System Groups and Logical Components’ ‘Solution Landscapes’
section. Choose the Solution where the system is to be added. From previous step, a Logical
Component should already be assigned. Now, these logical components are assigned systems.
First, right click under each System Role field and choose ‘Put in Solution’. Do this for instance for
‘Development System’, ‘Quality Assurance System’ and ‘Production System’. This determines that
systems for these logical components will be assigned
 Now, select the row containing the Logical Component and choose ‘Change Logical Component’.

It is here that using input help that for each of the System Roles a system can be assigned


Choose ‘Save’ to have the Solution landscape altered to the new assignment. Logs will be displayed
about the progress.
 The new system is added to the Solution Landscape
 The new system has now been added to the


Note: this step is only required if no Solution exists that the monitored system can be assigned to.
SAP Solution Manager organizer systems into Solutions. Various strategies for system organization exist: i.e. based on status (productive/non-productive), component (CRM/ERP/BW/etc) or Business unit (i.e. Poort, Commerce, etc.). This sections describes how to create a Solution, not define a strategy for the types of Solutions that should be defined (see for that the Solution Manager architecture document).
On the Solution Manager, call transaction SOLUTION_MANAGER.
A list of available Solutions is shown. Note: the list can be empty if no prior Solutions exist.

This Post describes the steps that are required to connect a (new) SAP system to the SAP Solution Manager, for instance to generate EarlyWatch Alert reports or for including the system on Solution Monitoring.
This Post describes the various steps that have to be performed, depending on the type of SAP system and the configuration that exists in Solution Manager. For a fresh installation of Solution Manager, all steps have to be performed at least once
2. Execution of activities
2.1. Create the system in SAP Solution Manager
Generally, new systems will be available known in the Solution Manager as their data is obtained from the System Landscape Directory. Especially for Java based systems, retrieving data from the SLD ensures that the correct instances are defined.However, sometimes systems are created under the wrong product in the Solution Manager when they are retrieved from the SLD. It is recommended to change the assigned product if it is not correct. Although for monitoring purposes it is not required per se, it is for usage of Maintenance Optimizer.
Way of working in practice:-
For SAP Net weaver 2004 and later systems, an installation key is required upon installation. This key has to be created using the SAP Solution Manager. To perform this action, the system will need to be created in Solution Manager. The general approach here is to create a new system (and assign the correct product), but not adding any data such as the database or server: this data is not required to generate the installation key. Then installing the system and registering it in the SLD, so the SLD will have also the technical data of the system. This information will then automatically be replicated to Solution Manager and enrich the system information there.
Maintain system settings for JAVA systems:-
For JAVA systems, after the data got replicated from the SLD to Solution Manager, some additional actions are required.
This is required as the ‘relevance’ field is used by Solution Manager to determine which systems can be mapped to which logical components. By default, systems have ‘Application Server ABAP’ as relevant component. As J2EE only systems do not have this system component, their product is not recognized. This has to be maintained in the ‘Landscape Components’ ‘Systems’ part of the landscape definition (transaction SMSY).
Choose the system that is to be maintained and choose the ‘Selection of Main Instances’ tab. Here, uncheck the check behind ‘Application Server ABAP.

 |
| security reason removed SID name, This is SMSY screen shot Check the ‘Application Server Java’ as relevant. Also, choose the ‘System Component’ checkbox and enter the  |

Finally, click the ‘Save’ button.
The system data for a JAVA system has now been correctly maintained in the Solution Manager
Register system for availability monitoring using CCMSPING
For availability monitoring (i.e. is the system UP) the CCMSPING agent is used. This agent will periodically, usually once a minute, check to see whether it performs a log on to a system. This section describes how to add a system to the systems monitored by CCMSPING
Preparation
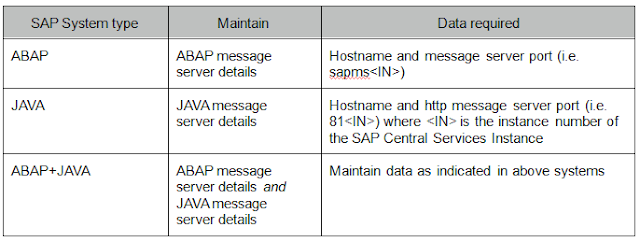
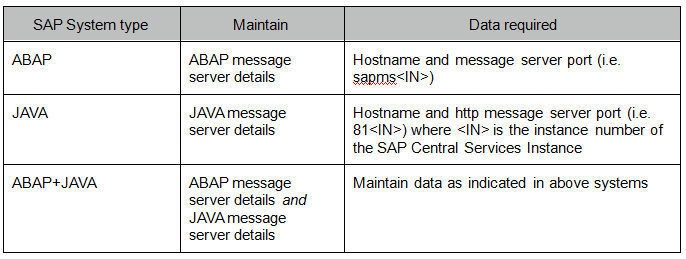
First, on the host where the CCMSPING agent is running (usually the Solution Manager host itself), add the following entry to the services file (
Note: the

By connecting to the message server, the CCMSPING agent will retrieve data about the various instances of the SAP system, including their availability and response time.
Note: to save time, it might be a good idea to add as many known
Configuration in Solution Manager
After the action in the last step, the CCMSPING agent is able to retrieve the port on which an SAP system’s message server is listening. Next step is to configure the agent in Solution Manager itself.
Log on to the Solution Manager and call transaction RZ21.
From the menu choose ‘Technical Infrastructure’ --> ‘Availability Monitoring’ --> ‘Configure CCMSPING Availability mon.’ This shows a list of monitoring systems.

Configuration here depends on the type of SAP system that is to be monitored.

To check whether CCMSPING is correctly retrieving data from the monitored system, call transaction RZ20. Choose template: ‘SAP CCMS Monitor Templates’ ‘Availability and Performance Overview’.

The system should now be visible in the monitoring tree.
Create RFC connections
Note: this step is only required for ABAP (and ABAP+JAVA) systems.
For the Solution Manager to retrieve data from a monitored system, RFC connections are required. To create the RFC connections to a monitored system (and back) two steps have to be performed. Also, an administrator user is required in the monitored system.
At the end of these steps, three RFC connections from Solution Manager to the monitored system will have been created:
• an RFC called SM_
• an RFC called SM_
• an RFC called SM_
Add authorization object to administrative user
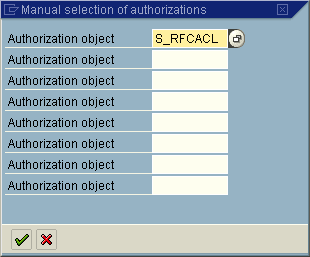
The Solution Manager can use trusted RFC connections for SSO type logon options. The setup of trusted RFC connections requires an authorization object assigned to the administrator that willcreate the RFC connection in the monitored system that is not a part of SAP_ALL or SAP_NEW. This step adds this authorization object. Add the S_RFCACL authorization object to the administrative user. In the system to be monitored, call the profile generator (transaction PFCG).

Enter a name for the role and choose ‘Create’.

Enter a description for the role and choose the ‘Authorizations’ tab. SAP will ask to save the role. Do so.

Click the ‘Propose Profile name’ button and then choose the ‘Change Authorization Data’ button

Choose not to use a template (‘Don not select templates’). Choose the the above button manually.
Check Agent Registration
In CEN, call transaction RZ21 and in the Topology section, choose ‘Agents for Local System’. Choose ‘Display Overview’.
Enter the authorization object. Choose Enter to continue.

Choose ‘Save’. Choose ‘Generate’. Choose ‘Back’ to go to role definition.
Back in the role maintenance screen, choose the ‘User’ tab. This makes it very quick to update the roles assign to users or assign the new role to a user. Enter the name of the user the role is to be assigned to and choose ‘User comparison’.


The administrative user (in this case called SAP-TI) now has authorizations to use and configure trusted RFC’s.
Note that every user in Solution Manager that is to use trusted RFC connections to log on to monitored systems, require these authorizations.
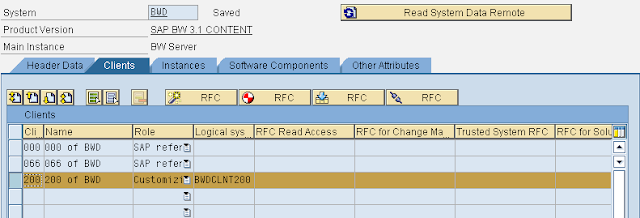
Create the actual RFC connections
Be careful: the system that is to be connected to should have the latest ST-PI and ST-A/PI installed! Also, an administrative user is required on the system to be connected with authorization for object S_RFCACL. Note that this object is NOT in SAP_ALL. See the previous section for instructions on how to assign this role to the user.In the Solution Manager system, call transaction SMSY. Expand the ‘Systems’ tree to the system that should be connected. Then, select the row with the client that should be used for communication with Solution Manager (generally the productive client or customizing client’

Note: be sure to be in change mode!

As can be seen, no RFC connections have been defined (these are used for Solution Manager configuration). Choose the ‘Generate RFC Destinations’ button.

The result is an ABAP system that is now connected through RFC to the Solution Manager.
Register SAPCCMSR agent
Note: this step is only required for JAVA and ABAP+JAVA systems.To collect information from systems based on the SAP WebAS JAVA, the SAPCCMSR agent is used. This agent runs on the monitored systems host and transfers collected data from the monitored system using RFC to the Solution Manager.
Depending on whether the host is a JAVA only or an ABAP+JAVA system, the configuration differs slightly:
• for JAVA only systems, the SAPCCMSR agent directly sends it’s data to the Solution Manager
• for ABAP+JAVA systems, the SAPCCMSR agent sends it’s data to the ABAP part of the monitored system, which then sends the data to the Solution Manager through the RFC connections defined in the previous section.
To perform this step, a userid and password for an administrative user and the CSMREG user is required for the system where the SAPCCMSR agent should register itself. Also, a csmconf file genereted in the system where the agent will register itself is required. Generating a csmconf file is described in the appendix to this chapter.

Register the agent:-
On the Java system to be monitored, start the Visual Administrator and choose ‘Cluster’ ‘Dispatcher’ ‘Services’ ‘Monitoring’. Choose the ‘CCMS Agent Configuration’ tab. Choose the file on local filesystem and enter required passwords. Finally, click register

Click the yellow triangle to automatically assign all authorizations.


System Group Entry
Call transaction RZ21. ‘Technical Infrastructure’ ‘Configure Central System’ ‘Maintain SystemGroups’. Check if the

Display the J2EE Engine Monitoring Data
Call transaction RZ20. Choose the monitor set ‘All Systems’ from ‘SAP J2EE Monitoring Templates’. There should be an entry for the J2EE system.
Appendix: create csmreg user and csmconf file
This appendix describes how to create a csmreg user and csmconf file in an monitored ABAP+JAVA
system to which an SAPCCMSR agent should register.
In the monitored system, call transaction RZ21. Choose ‘Technical Infrastructure’ ‘Configure
Central System’ ‘Create CSMREG User’
 Creating the CSMREG user only requires a password to be entered. Hit ‘Enter’ to create the user

Create a new Logical Component
Note: this step is only applicable if no existing Logical Component is available to which the new monitored system can be added.SAP Solution Manager uses Logical Components to group the role sof systems of a specific product and version into a business function. For instance, multiple productive R/3 systems might exist in an organization for various business units. The concept of logical components support the option of creating different logical components for the general SAP product R/3 for various business units.
It is recommended to use only your own (custom) logical components, instead of the SAP delivered ones.
Creation of the Logical Component
To create a new Logical component, proceed as follows: In the Solution Manager, call transaction SMSY.
In the transaction SMSY, click on ‘Solution Groups and Logical Components’. Expand the ‘Logical Components’ tree.
Expand the product and component to which the monitored system should be assigned and right click the entry. Choose ‘Create Logical Component’.

Choose the ‘Product’ and ‘Product version’ of the new system and name the Logical Component. It is recommended to use ‘Z_’ as a prefix for customer defined logical components.

The new Logical Component has now been created.
Assign the Logical Component to a Solution
Now the Logical Component has been defined, it should be assigned to the Solution to which the
monitored system should be added.
In the Solution Manager, call transaction ‘SOLUTION_MANAGER’.

This shows the landscape definition in relation to the logical components that are used to define the landscape. If no logical component exists for the new system, choose a new logical component from the input help

Expand the Logical Component tree to the one created in the previous chapted. Put a check before it and choose ‘Transfer’. Note that the one used in this example has a different name from the one created in the previous section
.

Choose ‘Save’ to save the changes to the Solution.
The new Logical Component has now been assigned to the Solution.
Add the system to a Solution by assigning it to a Logical Component
As now both a Solution and a Logical Component exist to which the monitored system can be
assigned, and the Solution and Logical Component have already been linked, assigning the
monitored system to the Solution is a matter of assigning it to the Logical Component. This section
describes how to perform this action.
In transaction SMSY, open the ‘System Groups and Logical Components’ ‘Solution Landscapes’
section. Choose the Solution where the system is to be added. From previous step, a Logical
Component should already be assigned. Now, these logical components are assigned systems.
First, right click under each System Role field and choose ‘Put in Solution’. Do this for instance for
‘Development System’, ‘Quality Assurance System’ and ‘Production System’. This determines that
systems for these logical components will be assigned


This shows the definition for the logical component and in particular the current system assignments.
It is here that using input help that for each of the System Roles a system can be assigned


Choose ‘Save’ to have the Solution landscape altered to the new assignment. Logs will be displayed
about the progress.


This user is used by monitoring agent to send information to the ABAP part of the monitored system. Now the csmreg user has been created, the csmconf file can be created. Call transaction RZ21. Choose ‘Technical Infrastructure’ à ‘Generate Configuration File for Agents’. Use the pop-up to choose a location on your local workstation where the file can be saved.


Note: it’s wise to delete this file once it is no longer required.
Create a Solution
Note: this step is only required if no Solution exists that the monitored system can be assigned to.
SAP Solution Manager organizer systems into Solutions. Various strategies for system organization exist: i.e. based on status (productive/non-productive), component (CRM/ERP/BW/etc) or Business unit (i.e. Poort, Commerce, etc.). This sections describes how to create a Solution, not define a strategy for the types of Solutions that should be defined (see for that the Solution Manager architecture document).
On the Solution Manager, call transaction SOLUTION_MANAGER.
A list of available Solutions is shown. Note: the list can be empty if no prior Solutions exist.

Hi,
ReplyDeleteThanks for all the wonderful Basis details you have posted so far... Just to check, this does not apply for Solman 7.0 n above rite.. For e.g. t-code solution_manager doesnt exist anymore. I really appreciate what all you have been doing so far... :)
Thanks,
Vivek
Hi Seshadri,
DeleteThank you for reading the blog.
you can use solman_admin or dswp for the same in solman 7.0.
In solman 7.1 EHP1 you need work with SOLMAN_WORKCENTER.
there are lots of changes in solution manager.
Thanks
Hi, this one is really good !
ReplyDeleteif possible Can you also provide such simple n good document for 7.0 or 7.1.
Thanks
Nice Post.
ReplyDeleteI like the way you written the post.
Post is very Informative and easy to understand
The process of erp implementation is referred as "ERP implmentation Life Cycle".ERP implementation life cycle focus on the ERP project which is carried out to make ERP up and running.
Thanks for sharing such a nice blog...
excellent post thanks for sharing from Kajal
ReplyDeleteWonderful information. Thanks for sharing this.
ReplyDeletesap gold partner
SAP Partners
Nice blog.
ReplyDeleteSap Service
Sap Consultant