Enhancement Pack 1 Installation on Netweaver 7.0 Systems BW ABAP
1 Introduction
This Procedure describes the steps to apply the Enhancement pack 1 on Net Weaver 7.0 Systems.
Note :
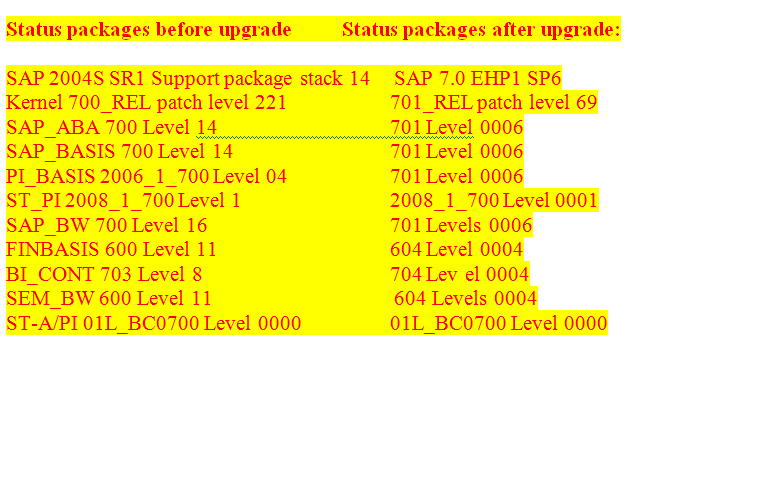
The target and the source support package levels are specific for each of the system and might be different for the systems you are going to do the upgrade this is an example of one of the upgraded systems
2.1 Software
On laptop of basis team Software
JRE Latest available JRE version on your desktop / laptop.(java webstart 6)
Software Location ( you can download the software from Service market place and save it in your disk )
Support Packs /etc//cdserv/Export/download/NW7.01SP06
3 Preparation in advance
Step Activity:
2. Downtime communication
Downtime communication should already be confirmed by the Managment
3. The following free disk space must be available:
/usr/sap/put :at least 25GB to place the installation-software and to handle subsequent steps and logging
/usr/sap/SIDtrans :at least 10GB available for managing packages
/oracle/
4. Software location
Create a directory to put the packages in. In this document I will use the directory /usr/sap/put/ehp1/.
5. Installation directory of Enhancement pack1
/usr/sap/put will be the default filesystem for the installation.
6. Make sure the stms configuration and the tp is working properly in your system.
7. Following User accounts will be used for EHP1 Installation :
DDIC - Client 000
J2EE_ADMIN
SDM
Firebasis – Client 000 (fire fighter ID with full access )
SAP Market Place: S-user ID
Oracle “System” Password
Make sure you are having all the users required for this installation
8. Support Package Level
Logon to SAP instance
Execute transaction – SPAM Note down SPAM level and ABAP Support Package levels
for bw system the minimum support package level for component SAP_BW should atleast contain support pack level 19 which is available in support package stack 17
Kindly refer note 1142832
9. EHP Installer: Check below link for detailed information on Enhancement Package Installer.
Document : SAP Enhancement Package Installer 1
10. Check open requests in SE10
During the step Checks the installer checks for pending requests in the system. Ask the Development-team to clean this up.
11. Check / change entries in table TIORA
Table class to container mapping
INFO: An inconsistency has been detected in your system:
Release '70' missing in index container 'PSAP
Release '70' missing in index container 'PSAP
Container pair 'PSAP
Container pair 'PSAP
The inconsistency could cause problems when new tables are created. It may additionally lead to incorrect free space requirements You are urged to fix the entries listed on the previous page now and repeat the check Check SAPNote 541542 for more information
Logon in SAP and goto SE16
Table name: TAORA
Check the entry in column TABSPACE for corresponding TABART entry SLDEF
This should be: ON SID: PSAP
Check the entry in column TABSPACE for corresponding TABART entry SLEXC
This should be: ON SID: PSAP
Logon in SAP and go to SE16
Table name: IAORA
Check the entry in column TABSPACE for corresponding TABART entry SLDEF
This should be: ON SID: PSAPSID700
Check the entry in column TABSPACE for corresponding TABART entry SLEXC
This should be: ON SID: PSAPSID700
12. Activate all ODS objects
SE38
RSUPGRCHECK
In the next screen make the following selections:
x Info objects
x Datastore Objects
x Infocubes
x Transfer rules
x Display log
After this press execute (F8).
If the result of check shows some objects which are not active, then contact the functional team and ask them to check those objects. Once this is done you can re-execute this report to make sure that those objects have been activated.
13. Place new R3trans
Download and update the new R3trans and tp in order to avoid errors
14. Correct access rights for /usr/sap/trans
To prevent errors during the extraction-phase correct the access rights for /usr/sap/trans:
as user root:
cd /usr/sap
chown -R
Note : this is only if your trans directory is the standarad /usr/sap/trans it may be different in other systems.
15. Check operation mode
Call transaction RZ04 to check the definition of the operationmodes. The entry for Dummy must be defined as:
Delete invalid operationmodes, especially the ones with incorrect servernames.
Check also if the number of backgroundprocesses is at least: 3
16. Run statistics
17. Check if resource quotas are unlimited
Logon to the central instance on os-level as user
sqlplus
/as sysdba
select * from dba_sys_privs where grantee = 'SAP
The result must give one of the following entries:
grantee=’SAPSR3/SAP
grantee=’SAPSR3/SAP
grant unlimited tablespace to SAP
18. Temporarily de-activate the backup-scheduling
After creating / checking the backup de-activate the backup scheduling in Cronacle for the targetsystem to prevent that a backup starts running unexpected. This happened on WXC and caused a serious delay!
19. Copy EHP installer software
to /usr/sap/put/
20. UPGRADING SUPPORT PACKS
IF your support package for SAP_BW is not up to date upgrade apply support pack stack 17.
21. SPAU AND SPDD
In the process you will be getting spau and spdd adjustments.


22. Send the request to ABAP team
Do not proceed unless they ask to proceed.
4 Installation of Enhancement pack Tool
23. Extract EHP installer software
cd /usr/sap/put
SAPCAR -xvf SAPehpi_31-10005802.SAR
This will create directory EHPI with subdirectories abap, java, jvm and sdt
24.Start the installation program
Open a new session and logon as user
cd /usr/sap/put/EHPI
nohup ./STARTUP jce_policy_zip=/usr/sap/put/jce_policy-1_5_0.zip
It will start few services. You may find few lines as below:
Feb 2, 2009 11:06:50 AM [Info]: Service "DSUService" started
Feb 2, 2009 11:06:50 AM [Info]: Services started.
Feb 2, 2009 11:06:50 AM [Info]: Starting HTTP server listening on port 4239
Feb 2, 2009 11:06:50 AM [Info]: HTTP server started.
Feb 2, 2009 11:06:50 AM [Info]: SL Controller started.
Once SL controller is started, Open the Internet explorer with below link. Remove the proxy settings
http://
on Linux level, CNTRL+C will stop the service. You may gracefully cancel / exit from the Java tool as well.
25. l Click on the link: Start EHP Installer Frontend (SDTGui) to launch the java tool.
IMPORTANT Note: SDTGUI may give error while connecting to the server where http service is running. Add the IP address entry in hosts file of desktop / laptop. Hosts files is located in c:\winnt\system32\drivers\etc\ directory. Edit the hosts file and add the IP address & hostname of the SAP system.
Ex:
145.26.53.58
145.26.53.166
26. SDTGui may give error if profile directory has many backup SAP profiles. Move all the backup profiles( *.old, *.date, *.1) to different directory.
cd /sapmnt/SID/profile
mv *.old /sapmnt/SID/profile/oldprofiles/
27. Backup of Database & Kernel
Check the online backup of the system. Before starting the installation, you must have latest online backup (you may want to take offline back for quicker restoration).
Take the kernel directory backup Refer kernel upgrade document.
28. Take snap shot of RTCCTOOL.
Execute the transaction: ST13 Select RTCCTOOL Click Execute Button

Take the screen shot & note down the required ST-A/PI, ST-PI patches & other details.
29. Checks for V3 Updates.
SE38 -> RSM13005 -> Execute -> Check 'Outstanding Collective Runs' -> Execute
30. Bring the database to noarchivelog mode
Note: this is specific to client requirement whether they want to run the upgrade in arhivelog or noarchivelog mode.
5 Enhancement Pack Implementation
After java tool is opened
KEYWORD:
Provide the Keyword for the installation: (note) 1747214 (EHP Inst. version 710-2)
DOWNLOAD DIRECTORY
Provide the location for the packages to be installed
32. Select the option below and press ok

Press OK
33 Select continue and give ok

34. Then press OK
35 Select linux as OS and give ok

35. The following error may occur correct and this erro and then continue
 36 Steps to clear the above error
Determine the objects that are affected.
Start the database utility transaction (transaction SE14) and choose DB RequestsMass Processing.
Choose All requests.
The worklist of the conversion program appears. This worklist was generated by developments or modifications in your SAP system, but has not yet been processed.
Choose DB requestsCreated with import.
The worklist that was not processed correctly during the last installation appears.
2.Check the meaning and status of the requests.
In contrast to the procedure for the message Restart logs of DB conversions found, this procedure can also include requests for indexes, views and matchcode objects. The requests that are found are not always terminated. They might not even have been started.
Ask the last person who changed the object if the request should still be processed.
If the user does not want it to be processed, select the request and choose Delete selected.
This removes the objects from the worklist of the conversion program.
3.Process the outstanding requests.
You can select the requests from the list of mass processing requests and schedule a job for execution with the function Schedule selections.
Go to the detailed display of the object by double-clicking it in the list of requests created by the import.
Schedule the request, or continue it. Since you do not know how long this takes, choose
Processing type background
37.Implement the following notes if already their in the system neglect it.
And then press continue

38.Extraction Phase:

39.Provide DDIC password & Oracle-System password.


41. End of Extraction Phase.

Please check / note all the information mentioned in this page


Configuration Phase:
In this phase, tool will collect information required for installing support packs.

You may choose “Standard Resource Use”. During the downtime phase, you will be asked to switch off the archive log mode.
43 The archiving mode should be disabled and press continue

44.Do not start SGEN

45 Give the following parameter settings

46.Select option no and proceed

47.Provide the xml file location. Usually available in /usr/sap/put/. This xml file consists of all support stack information required for installation from existing source stack to target stack.
* How to generate xml file: Please read appendix section.

48.Tool will read from the xml file and displays the target component level (Stack) supposed to be installed

49.Tool will ask to enter EHP keyword. Check the SAP note and enter the keyword


Give the following options and give continue

Install the missing addons and give continue

Click on confirm and ok

Select the following options and give continue

Give continue this instance number picks up automatically

Give no and continue

Configuration Phase – completed.

Tool will proceed to next phase – “CHECKS”. In this phase, tool will check if your system fulfils the requirement for EHP1. Click “Next”/ “Continue” button.
Tool may prompt for creation of additional tablespace & extend few tablespaces.
Use BRTOOLS and extend /create the tablespace as indicated.


Tool will provide the list of transports that are locking the objects / yet to be released. Contact the technical focal point for releasing the transport. If any objects are modified in client 002, check and release such requests.

After completing the activities, click “next”/ “continue” button. Tool will recheck the system pre-requisites and completes the “Checks” phase.

During the “preprocessing” phase, tool will lock the development environment. Select “Lock” when it prompts for locking the development environment

 Adjust your repository now!
!!! ATTENTION !!!
Please proceed as follows:
- Logon to the shadown Instance: 03
- Set the System Change option with transaction SE06
- Create users for modification adjustment by copying
user DDIC with transaction SU01
- Logon to the shadow instance as ordinary user and
make adjustments with transaction SPDD
Refer to the manual for further information
Repository adjustment processed?
DO NOT ANSWER THE RESPONSE NOW !!
Ask someone from the development-team to check the ABAP Dictionary objects in transaction SPDD.

 Set the database in norarch mode and continue this is already been done in the begining
 The currnet stage is completed click nextClick Actions completed and then continue
Tool will stop the SAP instance and create the shadow instance. Check the SAP process. You may not be able to logon to SAP instance at this point.
 Click actions completed and then continue
 You may check the “Monitor” tab for progress of the implementation. Few times activity will be
 Tool will prompt when all activities are completed.

 Post Processing Phase:
 Tool will schedule SGEN.
 Click continue as abap technical team will do “SPAU adjustment” later.
 PostProcessing phase will finish when all activities are completed
 Finish Phase.
 80. Check the system health status be executing the basis transactions.
Ex: SM50, SM51, ST22, SM12, SM13, SM21, SM04, ST02, ST06, SM28, etc
81. Carry on post support pack process by executing the RTCCTOOL from ST13.
82. Run RSA1 as user DDIC
Logon to the system as user DDIC (not dcpsys)
Go to transaction RSA1
This will start the following backgroundjobs for activation
RSFIXUPG
BI_TCO_ACTIVATION
83. Update SAPDBA Role
Creating and Updating the SAPDBA Role
The enhancement package installation imports additional objects that you need to adjust. This
means that you must execute the SQL scriptsapdba_role.sql again.
Proceed as follows:
1. Log on as user ora
2. Start the SQL script with:
cd $ORACLE_HOME/dbs
cp /usr/sap/
sqlplus /nolog @sapdba_role
Where
If the following error message appears, you can ignore it:
Error accessing PRODUCT_USER_PROFILE
Warning: Product user profile information not loaded!
You may need to run PUBLD.SQL as SYSTEM.
84. Check the archive log mode. Set to “Archive log Mode” and Schedule online backup
85. Carry out basis health check again and handover the system.
APPENDIX How to Generate XML file as input file for Enhancement Pack Installer:
http://service.sap.com/ Login with S-user id Download SAP Support Packages Entry by Application Group SAP NetWeaver SAP NETWEAVER SAP NETWEAVER 7.0 Support Package Stacks Support Package Stacks
Select Target stack (As per the requirement)
Select Source Stack (As per existing stack level in your system)
In Usage Selection: Deselect components, which are not installed on your system
Ex: As shown in the screen shot

Click Next In Config Tree Select Appropriate Configuration
Ex: Open the tree SAP IGS 7.00 for Application Server ABAP, Application Server Java, BI Java, Business Intelligence, Enterprise Portal…. …………………..
Select: AIX 64 bit
Open the tree SAP KERNEL 7.01 64-BIT UNICODE for Application Server ABAP, Application Server Java, BI Java, Business Intelligence, Enterprise Portal…………………
Select #Database independent & ORACLE
Click on “Next Step” button
Click on “Save As File”
Click on the link “Right Click to save this table as a XML file” & save the file. Upload this file to SAP system with appropriate permissions & ownership and place in the directory where all SAR & SCA files are stored.
When you execute the transaction SPAM, System may popup a message on “Missing Maintenance Certificate” Message.
All SAP products based on SAP NetWeaver 7.0 and beyond require a Maintenance Certificate.The Maintenance Certificate enables SAP's software logistics tools (like SPAM, SAINT, JSPM,) to identify your system and the exact scope of corresponding SAP maintenance agreement. It ensures that only customers with a valid maintenance contract can apply Support Packages. As of January '09 software logistics tools will only apply maintenance items if a valid Maintenance Certificate is available.

Please generate the maintenance certificate using S-user id and password. Document: How to generate maintenance certificate
Once you receiving the license, save the license txt file onto desktop. Execute the transaction SLICENSE Click Install Select the license file click OK. A maintenance license will be installed(Maintenance_ORA).
Provide information on change request if any. Otherwise select “No”.
